
Scale: 1/72
Manufacturer: Hasegawa
No: D16
Item: Grumman F11F-1 Tiger (Blue
Angels)
In the late 50s, Grumman introduced the first of its supersonic "cats" to U.S. Navy service -- the F11F Tiger. Although it served on several carriers, the Tiger was quickly outpaced by the F-8 Crusader, and as a result, had a relatively short service life.
The Hasegawa 1:72 kit remains the most accurate model of the Tiger. I built the old version that has Blue Angels markings for the number 1,2,3 and 4 aircraft. I believe Hasegawa recently reissued the kit with the same decals.
The kit sports raised minor panel lines (lots of them) and recessed control surface lines. The cockpit is fairly sparse, with a so-so seat and decals for the instrument panels and consoles. I opted to use parts from the Airwaves F11F detail set to jazz the cockpit up a bit, since I wanted the canopy open.
The model went together quite easily, especially considering its age. The two fuselage halves include a solid tail section. The wings and horizontal stabilizers are also solid pieces, simplifying assembly. The canopy is typically thick but useable, especially in the open position.
The biggest challenge was restoring the plethora of surface detail lost when sanding the top and bottom seams of the fuselage. Be prepared: It's a lot of work! I referred to illustrations in the F11F Tiger "Detail & Scale" to rescribe the panels using a #11 X-Acto blade. The thin raised lines created by the knife are indistinguishable from the original panel lines.
I painted the Tiger with a gloss dark blue Floquil railroad paint, CSX Blue (Gloss). The Blue Angels decals include Bu. Nos. and pilot names for four aircraft, but the instructions note that the coincidence is certain only for the number two aircraft. The decals themselves went on smoothly, and responded reasonably well to Super Sol softener. Unlike some Blues' kits I've heard of, the yellow markings are acceptably opaque and don't turn that sickly shade of green!
I brushed on a coat of Future to seal the decals, then added the appropriate natural metal areas (slats and leading edges) using the dull side of aluminum foil. I hand-painted the canopy frames, then used a toothpick to remove any excess and straighten out the lines. Finally, I scrounged figures of a pilot and ground crewman from my spares box, painted them in a lighter blue (to match several illustrations of Blues' crews) and placed them on the base in front of the aircraft.
Building my Tiger took about 25 hours, but I'm
slow and picky. I'd recommend this kit to
anyone who has several kits under their belt because of the rescribing
problem. If you don't want to restore the surface
detail, you could probably bang a decent-looking
model out in a couple of hours.
Author: Les Dorr Jr
ldorr@capaccess.org
Scale: 1/72
Manufacturer: Hasegawa
No: BP6
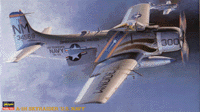
Item: Douglas A-1H Skyraider "U.S. Navy"
Much has been written about Hasegawas new Skyraider kit. I won't write
a review that are similar to the others.
Instead, I will point out some small details that Hasegawa has missed out on their, in all respect, wonderful kit.
1. On the fuselage, almost from the bulky antenna to the vertical stabilizer, the real aircraft has a sharp-edged spine.
In this area the kit are very flat and must be built up with putty and
then sanded to a sharp profile.
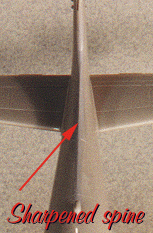
I think it's possible for Hasegawa to "update" the mould to achieve
the right profile.
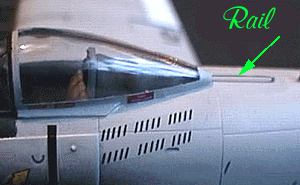
2. Behind the cockpit glass there is a "rail" that supports the glass when it's open.
In the kit, this "rail" are moulded solid, and must be replaced with
stretched sprue or copper thread.
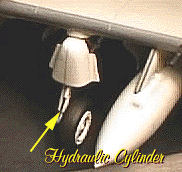
3. On the landing legs there should be some hydraulic cylinders
that are left out in the kit.
You can make some new ones out of steel wire and stretched styrene
tubes.
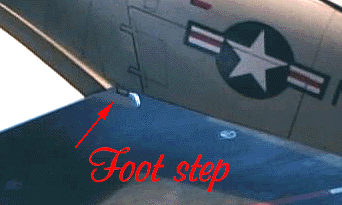
Finally You have to add two small foot steps on each side of the fuselage
at the wing root.
The decals that are included in the kit depicts one machine from VA-145
and the other is a CAG Bird of CVW-19 VA-52 "Knight Riders".
The quality is good but a little bit on the thick side.
I choosed to use decals from Superscale sheet No: 72-118, an aircraft from: VA-176 USS Intrepid.
That's about all...
One more thing...
I thought I should mention what I saw on Rec.Models.Scale
In article <xxxxxxxxxxxxxx.XXXXXXXX@ladder01.news.aol.com>,
xxxxxxxxx@aol.com says...
>Hi, Y'all:
>
>Now correct me if I'm wrong, but doesn't the
Skyraider have its tail
>cranked off to one side, to compensate for the
so called "P" factor?? In
>1/72nd scale, the Airfix kit is the only one
that does this correctly, and
>in 48th, Monogram's kits. My examination
of the new Hasegawa kit
>indicates they didn't do their homework, and
missed this offset.
>None of the reviews on the net I have seen make
mention of this error.
>Cheers,
>Yyyyyy Zzzzzzzz
Hello!, Yyyyyy
When I read your article, I immediately cut the
fuselage halves from the
sprue and dry-mounted them to see if it was true.
I found that my example has the offset, it isn't
much but still visible
to the naked eye. (
2 degrees )
I don't have the correct scale drawings or knowledge
about the level that
the original were cranked, but Im pretty sure
that it is to the right
direction anyway.
To say that the Airfix Skyraider has the correct
tail, is an overstatement,
on the contrary this is the kits Achilles heel.
It looks like Quasimodo, the hunchback of Notre Dame. ;-)
My conclusion is that Hasegawa has done their homework well.
One thing you could wonder though... Why did they
choose to make the
AD-6/A-1H variant with armour plates...?
But that is another question...
Hawk - SWEDEN
...more to come.
